Composting in small spaces is not only feasible but also incredibly rewarding. Urban dwellers, families, millennials, and garden enthusiasts can embrace this sustainable practice by understanding the basics of how composting works, even when space is limited. The key to successful composting is managing the balance between carbon-rich “browns” and nitrogen-rich “greens.”
In small spaces, you may find it beneficial to utilize a compact composting system, such as a worm bin or a tumbling composter. These options are designed to fit neatly into apartments, balconies, or smaller yards. By doing so, you can transform your kitchen scraps into rich, fertile soil without taking up excessive room.
Consider these essential factors for effective composting:
- Carbon to Nitrogen Ratio: Aim for a mix of about 3:1 or 4:1 of browns (e.g., dried leaves, cardboard, and paper) to greens (e.g., vegetable scraps, coffee grounds, and grass clippings). This helps maintain a healthy compost environment.
- Moisture Levels: Keeping your compost moist, but not soggy, is crucial. A good rule of thumb is to aim for the moisture level of a wrung-out sponge.
- Air Circulation: Aeration is vital; make sure to turn your compost regularly to promote aerobic decomposition. In small bins, consider using a compost aerator tool to keep the air flowing.
- Temperature Monitoring: The ideal temperature for composting is between 130°F and 160°F. If your compost stays cool, add more greens and turn it more frequently to jumpstart the decomposition process.
Keep in mind that certain materials should not be added to your compost bin, including meat, dairy, fats, and oils, as they can create odors and attract pests. Instead, focus on vegetable scraps, fruit peels, shredded paper, and yard waste.
Lastly, consider exploring local resources or online communities dedicated to urban gardening and composting. These can provide not only inspiration but also advice specific to your geographical area, helping you to tailor your composting efforts to your unique situation. With a little patience and attention, you will soon see that even small spaces can yield rich compost that nurtures your garden!
Choosing the right location for your bin
Finding the right location for your compost bin is crucial to ensure its efficiency and functionality, especially in limited spaces. The placement of your compost bin can significantly influence the decomposition process and ultimately affect the quality of the compost produced. Here are several key considerations to keep in mind when selecting a spot for your composting system:
- Accessibility: Choose a location that is easily accessible for adding kitchen scraps and other materials. You want to make the composting process as convenient as possible to encourage regular use. If it’s too far away, you may be less likely to maintain the habit.
- Sunlight Exposure: Compost bins benefit from some sunlight, which helps maintain warmth and speeds up the decomposition process. However, too much direct sunlight can lead to drying out. Aim for a spot that receives partial sunlight, which can help regulate temperature without baking the compost.
- Drainage: Proper drainage is essential for maintaining the right moisture levels. A location that is too wet can lead to anaerobic conditions, resulting in odors and slow decomposition. Ensure that water can drain away from the compost bin, and if possible, consider elevating the bin to improve airflow and drainage.
- Proximity to a Water Source: Composting may require periodic watering, especially in dry conditions. Placing your bin near a hose or water access can simplify this process and help maintain adequate moisture levels.
- Out of Sight, Out of Mind: While accessibility is important, you may prefer to place the compost bin in an area that is out of the main view, such as behind a garden shed or tucked into a corner of your yard or balcony. This can help maintain the aesthetic appeal of your space while still allowing for efficient composting.
To illustrate how these factors come into play, the following table compares two hypothetical locations for a compost bin within a small outdoor space:
| Location | Accessibility | Sunlight Exposure | Drainage | Proximity to Water | Visual Appeal |
|---|---|---|---|---|---|
| Garden Shed Corner | Moderate | Partial Sun | Good | Nearby Hose | Less Visible |
| Patio Next to Dining Area | Easy | Full Sun | Poor (drains poorly during rain) | Close | Highly Visible |
In this example, the garden shed corner offers a better overall balance for composting, with good drainage and partial sunlight, even though it is a bit less accessible than the patio location. In contrast, while the patio is easily accessible and visually appealing, its poor drainage could lead to problems in maintaining a healthy composting environment.
Ultimately, consider your specific needs and the limitations of your space when deciding on the best location for your compost bin. By strategically choosing the right spot, you can enhance the efficiency of your composting efforts and ensure a productive system that feeds your plants and reduces waste effectively.
Selecting materials for your compost bin

When it comes to selecting materials for your compost bin, the proper choices can significantly impact the efficiency and effectiveness of your composting efforts. Building a healthy compost system requires a thoughtful blend of various organic materials. Here’s a practical guide to help you gather the right components:
- Organic “Browns”: These materials are high in carbon and provide the structure your compost needs to breathe. Great examples include:
- Dried leaves
- Shredded paper and cardboard (avoid glossy or colored paper)
- Straw or hay
- Wood chips or sawdust (ensure they’re from untreated wood)
- Organic “Greens”: Rich in nitrogen, greens are crucial for fueling the composting process. Incorporate items such as:
- Fruit and vegetable scraps (peels, cores, etc.)
- Grass clippings
- Fresh plant trimmings
- Coffee grounds and tea bags (ensure they’re caffeine-free)
- Moisture Sources: You’ll also need to ensure your compost maintains proper moisture. Items like:
- Sponge-like materials (e.g., coconut coir)
- Wet newspaper strips
- Watered-down kitchen scraps
- Other Materials: For balanced compost, consider adding small quantities of:
- Crushed eggshells (for calcium)
- Wood ashes (in moderation, as they can raise pH levels)
- Hair or fur (from pets or natural fibers)
While gathering materials, it’s essential to remember some no-nos: steer clear of adding any meat, dairy, fats, or processed foods, as these can attract pests and lead to unpleasant odors. Additionally, avoid diseased plants and invasive weeds that may survive the composting process and continue to spread.
When constructing your compost, aim for a balanced mix of browns and greens to maintain a healthy carbon to nitrogen ratio, ideally around 3:1 or 4:1. Layering these materials in your bin can help manage moisture levels and promote aeration. Start with a layer of coarse browns to create good airflow, followed by greens, and continue alternating until the bin is full. You can incorporate a small amount of soil at the start to introduce beneficial microorganisms that aid in decomposition.
Monitor your compost bin as it transforms into rich, dark humus. Don’t be afraid to add more materials as they become available, and occasionally turn the compost to ensure proper aeration and help speed up the process. By using the right materials and maintaining the proper balance, you’ll soon reap the rewards of your effort with vibrant plants and reduced kitchen waste!
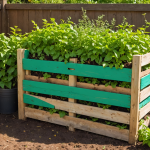
Step-by-step guide to building your compost bin
To begin building your compost bin, start by gathering all necessary materials. If you’re opting for a wooden bin, choose untreated wood like cedar or pine for durability. Along with the wood, prepare screws or nails, and a saw for cutting the lumber to size. For a simple and cost-effective compost bin, consider dimensions that can accommodate your available space—typically a size of around 3 feet wide, 3 feet deep, and 3 feet tall is sufficient for effective composting.
Once you have your materials arranged, clear the area where you plan to position your bin. This should be a flat, well-drained spot to ensure proper airflow and moisture retention. Begin by cutting your wood to size based on the planned dimensions of your bin. Assemble the side panels first, attaching each section securely with screws or nails. When joining the corners, ensure they form a box shape that is sturdy enough to withstand the weight of your compost materials.
Next, attach a front panel that can be removable or adjustable, enabling easy access to the compost. This is crucial for turning and aerating the pile. If you are using slatted sides, leave some gaps between the slats to promote airflow. After securing the sides and front, create a bottom using either additional wooden slats or a hardware cloth grid to help with drainage while preventing rodents from entering. This step is particularly important in small spaces where the compost bin may be exposed to animals.
For a different approach, if you’re limited on space or prefer a more mobile option, consider building a compost tumbler. Similar to the bin, gather your materials, which may include a large plastic barrel with a lid, sturdy PVC pipes, and supportive bracing materials. Cut openings in the sides of the barrel to allow air circulation and ensure it is mounted on a frame that enables easy rotation. Turning the tumbler regularly will speed up the composting process and minimize odors, making it a great option for tight areas.
Before filling your new compost bin, consider lining the bottom with a layer of coarse materials, such as straw or small branches. This promotes drainage and aeration. Begin adding collected kitchen scraps, yard waste, and other organic materials, following the recommended carbon to nitrogen ratios. Layer the browns and greens to maintain balance and continue turning the compost every couple of weeks.
“The future will either be green or not at all.” – Bob Brown
As you build your compost bin, remember that customization is key. You can paint or decorate your wooden bin to match your space’s aesthetics or add wheels to your tumbler for ease of movement. Depending on your preferences and resources, your compost bin can serve as both a practical tool for sustainable waste reduction and a visually appealing feature in your urban garden. Take your time during the construction process, ensuring all parts are secure and well-assembled. By following these steps, you’ll create a functional composting system that suits your small space beautifully.
Maintaining your compost for optimal results

To maintain your compost effectively, it’s essential to monitor and adjust several key factors to ensure optimal decomposition. Regularly turning your compost pile, ideally every two weeks, aerates the material, promoting the growth of aerobic bacteria that are crucial for breaking down organic matter. The act of turning not only helps to mix the ingredients but also redistributes moisture and heat, which accelerates the composting process.
Additionally, maintain an appropriate moisture level. Your compost should feel like a damp sponge—moist but not soggy. If your compost appears too dry, add water gradually while turning the pile to incorporate it evenly. Conversely, if it’s overly wet, you can amend it by adding more carbon-rich materials like shredded paper or dry leaves to absorb excess moisture. The balance between wet and dry is critical; too much moisture can lead to anaerobic conditions, resulting in unpleasant odors and slow decomposition.
Temperature is another vital aspect of successful composting. Regularly check the temperature of your compost to ensure it remains within the ideal range of 130°F to 160°F. There are various methods to monitor temperature, including using a compost thermometer. If the temperature drops below this range, incorporate more greens to provide additional nitrogen and turn the pile more often to reactivate microbial activity.
Regularly assess the composition of your compost for signs of imbalance. If you notice a smell, it might indicate too much nitrogen. In this case, add more browns and turn the pile to aerate it. If materials are taking too long to decompose, you may need to chop them into smaller pieces, as shredding increases the surface area for microbes to work on. This attention to detail will help ensure your compost bin remains an efficient and effective system.
By observing these maintenance practices, you foster an environment that nurtures beneficial microbes, expedites decomposition, and yields high-quality compost that can transform your garden. As you delve deeper into the world of composting, consider experimenting with different materials and methods. Engage with fellow composters in community forums or local workshops to share your successes and learn from others. Explore the science behind composting and the intricate ecosystems it supports. The journey of maintaining a compost bin is not merely a chore; it’s an evolving learning experience rich with potential for sustainability and community connection.
- What can I compost in a small space?
- You can compost a variety of organic materials such as vegetable scraps, fruit peels, grass clippings, dried leaves, and crushed eggshells. Avoid adding meat, dairy, and oily materials, as these can create odors and attract pests.
- How often should I turn my compost?
- It is recommended to turn your compost every two weeks to ensure proper aeration and facilitate the decomposition process. This also helps to distribute moisture and heat evenly throughout the pile.
- How do I maintain moisture in my compost bin?
- To maintain proper moisture, check the compost regularly and aim for a consistency similar to a damp sponge. If it feels too dry, add small amounts of water while turning the pile; if it’s too wet, mix in dry carbon-rich materials like shredded paper or straw.
- What temperature should my compost be?
- The ideal temperature for composting is between 130°F and 160°F. Regularly check the temperature with a compost thermometer, and if it drops too low, consider adding more nitrogen-rich materials and turning the pile more frequently.
- How long does it take for compost to be ready?
- Compost can take anywhere from a few weeks to several months to break down, depending on factors like the materials used, temperature, moisture level, and how often it’s turned. Regular maintenance can expedite the process.
- Can I compost in the winter?
- Yes, you can compost in winter, but it may slow down the decomposition process due to colder temperatures. Consider insulating your compost bin or adding more greens to maintain heat, and continue turning it regularly.
- What if my compost smells bad?
- A foul smell usually indicates an anaerobic condition caused by too much nitrogen or too little air. To remedy this, add carbon-rich materials, turn the compost more frequently, and ensure proper airflow to encourage aerobic decomposition.
Tips for successful composting in small areas
Successful composting in small areas requires a bit of creativity and a few clever strategies to maximize efficiency while minimizing challenges. Here are some practical tips to help ensure your compost bin thrives, even in compact spaces:
- Choose the Right Container: Consider using stackable bins or a worm bin, which can fit conveniently on a balcony or countertop. A bokashi bin, a fermentation-style composting system, is another excellent option for small spaces. It utilizes a special inoculated bran to break down kitchen waste without odors.
- Maximize Vertical Space: If you only have a small patch of soil or an outdoor area, consider going vertical. Create a wall-mounted compost bin or use planter boxes above your composting setup. This can help utilize airspace and can mimic a multi-tiered system.
- Regularly Monitor the Bin: Setting a consistent routine to check on your compost is vital. Aim to inspect it weekly to assess moisture, temperature, and composition. This will allow for easy adjustments and prevent issues before they escalate. You might even set calendar reminders to help stay on track.
- Utilize Kitchen Scraps Effectively: Many small-space composters can feel overwhelmed with the challenge of adding kitchen scraps. Designate a specific container to collect scraps daily, making it easier to transport and add them when you walk past your compost bin. This not only keeps your kitchen tidy but also streamlines the process.
- Consider Using a Compost Aerator: To enhance aeration, particularly in compact bins, invest in a compost aerator. This tool allows you to easily stir the contents without needing to fully turn the pile, promoting decomposition while reducing physical effort.
- Incorporate Composting “Helpers”: You might also find success in utilizing other home systems to assist your composting efforts. For example, coffee lovers can create a “coffee compost station” where they collect used coffee grounds for composting while enjoying their favorite brew.
- Be Patient and Observant: Every composting system is distinct. Keep an eye on the decomposition process and be prepared to adapt. If you notice certain materials are taking longer to break down, try chopping them into smaller pieces, or adjust your carbon-to-nitrogen ratio to improve balance.
Lastly, engage with neighbors or friends who share your composting interest. You can exchange insights, materials, or even share a community composting space if feasible. A small composting community can provide motivation and additional resources!